How to Make an EZScreen DIY Silk Screen Stencil Step by Step Tutorial
Table of Content
Just keep spraying and eventually you'll see the image start to appear more and more as the emulsion washes away. You've just made your first silkscreen. Place a clean piece of glass over the image to hold it tight against the screen. Hold the image in your hand so you're looking at the image how you want to see it on your tee shirt, then flip it over and place it on the screen. You'll notice my image appears white now, because I've flipped it over and the dark portion of it is now touching the screen.

Do this lightly the first time to ensure that the screen has been evenly covered. This is called flooding the screen. Then bring the squeegee across the screen again. You'll need to hold your squeegee at an angle to get a clear print – only the edge of the blade should be in contact with the screen. Pull the squeegee back over the screen in the opposite direction to push the ink through the screen and onto your paper. Horizontally place the black matte surface or a bristol board with the 150-watt lightbulb shining directly on it.
Pick & Print an Image
After emulsion has been exposed, remove transparency and take to wash out sink. Here gently rinse out entire screen- the emulsion where the image was will completely wash away as well as any excess emulsion that could run into image while drying. After rinse set screen aside to dry. PICRYL is the largest media source for public domain images, scans, and documents.
They have custom messages printed that unite the people attending the event, which makes them extremely popular. If sunlight is not available, we strongly recommend using one of our tested artificial lights to expose the stencils. Using your own light may result in over or under exposed stencils.
Choose the type of message you'd like to post
You can place the screen at a degree angle against the wall. Make sure your screen has adequate support and is standing unaided. Follow this how-to for screen printing t-shirts tutorial below to learn how to put a picture on a shirt. It is written in sequential order, so follow it from the first step to the last step.
One could trace right before painting in the glue. Some of the markers of the same type only come out once they get wet, but all must be tested to see if they will leave a stain. Take the sheer fabric that you have found, as well as the embroidery hoop that you purchased for cheap. Stretch the fabric as tight as you can across the embroidery hoop, but it is delicate, so be careful to not stretch it too hard.
Drag Paint Along Your Mesh
When you've drained the photo of any colour, print it out and let's get started. The technical storage or access is required to create user profiles to send advertising, or to track the user on a website or across several websites for similar marketing purposes. The technical storage or access that is used exclusively for anonymous statistical purposes. If your print looks faded like this, just add more pressure to your squeegee the next time you print.
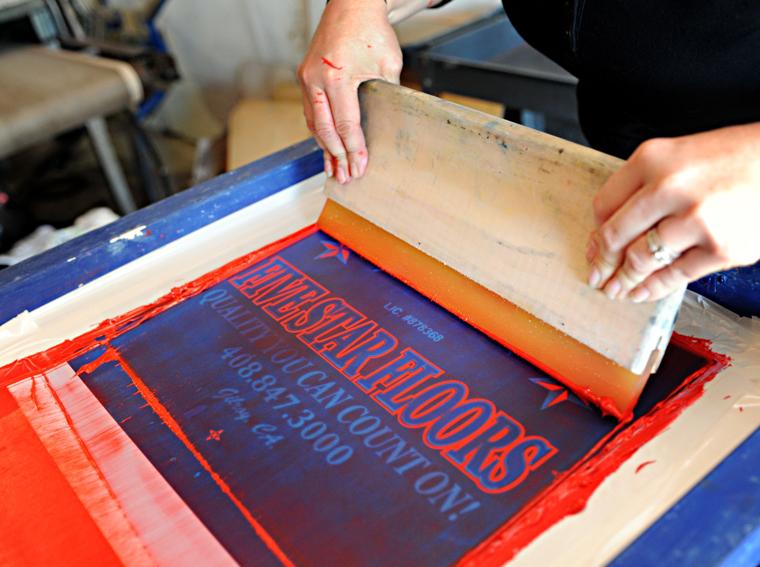
Take desired ink and spread across screen below image. Take squeegee and pull ink through screen. Best results for pulling squeegee are at a almost a straight up and down angle. A test pull should be done first to check for any discrepancies etc. Take textile and place on platen for desired placement and continue with print. Coat screen with photo sensitive emulsion.
Step 2: Finding an Image
It takes a while to figure out the right exposure time for your images. You also need something that's matte black to put your screen on for the exposure. A black piece of cardboard or bristol board would work well too.
Emulsion side should be facing up towards sunlight (5-10 minutes). If it's windy, place weights on the stencil like tiles from a hardware store. Rotate the tiles so the stencil cures evenly. Soak in a sink or bucket of tap water for a minimum of 15 minutes.
F you're unsure as to whether it's dark enough, hold your image up to the light. If light comes through, it isn't dark enough. Either print another copy and double them up on top of each other, or colour in your paper with a black marker. Decide on an image you want to print.
The best way to do this is to use a 150-watt lightbulb, you don’t need a lightbox. Read the instructions on your emulsion solution for a time estimate on how long you should expose your screen and how far the light should be placed relative to your screen. The lightbulb should directly face your screen. We hope you have found this beginners guide to screen printing useful. You'll find plenty of inspiration and advice on how to use screen printing right here on Gathered! Discover the kit you need to produce your own screens and look after them well in our screen printing kit buyers guide.
You’ll learn the best steps taken for DIY t-shirt screen printing which is basically how to put a picture on a shirt. I think the holes in tulle are still too big to get crisp lines. The bigger the holes in the "netting" or sheer fabric, the less clean an edge one can make. But you might just do a quick test project on a scrap piece of tulle and a piece of old white fabric. It's polyester and more fine than tulle.


Comments
Post a Comment